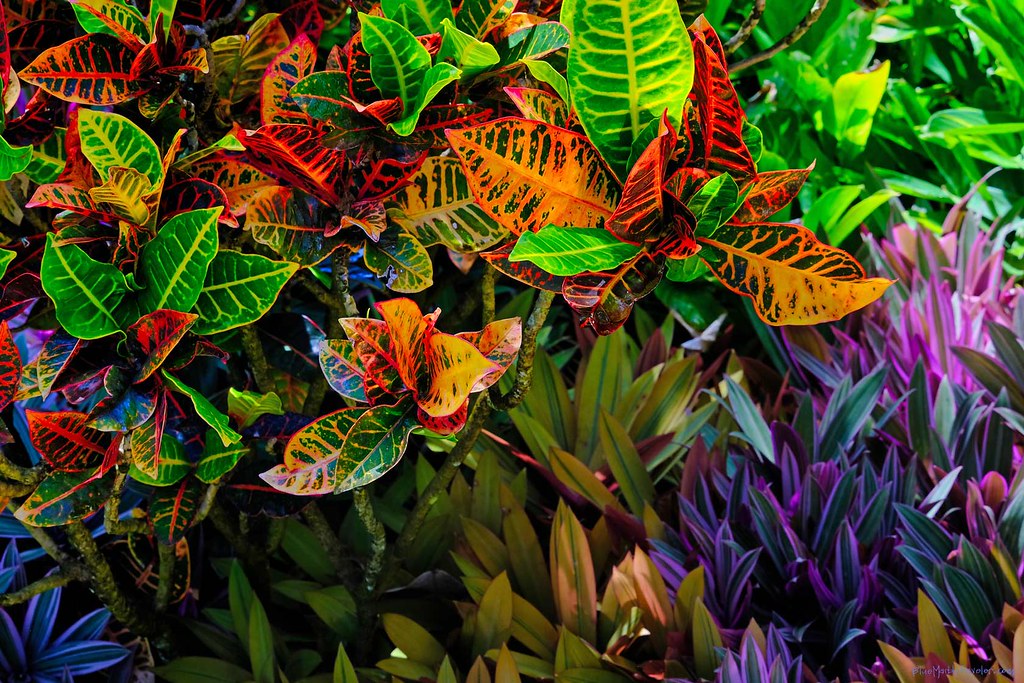
Croton plants, known for their vibrant, multicolored foliage, are popular houseplants that can add a splash of color to any indoor space. Native to tropical regions, these plants require specific care to thrive. This guide will cover everything you need to know to keep your croton plant healthy and vibrant.
Understanding Croton Plants
Croton plants, scientifically known as Codiaeum variegatum, are prized for their stunning leaves, which can display a mix of green, yellow, red, orange, and purple. They are often grown indoors in pots but can also be used as outdoor plants in warmer climates.
Light Requirements
Crotons are sun-loving plants. They thrive in bright, indirect sunlight. Here are some tips for providing the right light:
Indoors: Place your croton near a window where it can receive plenty of bright, filtered light. Avoid direct sunlight, which can scorch the leaves.
Outdoors: If you’re growing crotons outside, ensure they are in a location with dappled sunlight or partial shade to protect them from the harsh midday sun.
Watering Needs
Proper watering is crucial for croton health. These plants prefer moist but well-drained soil. Here’s how to manage their watering needs:
Consistency: Water your croton regularly to keep the soil consistently moist but not soggy. Allow the top inch of soil to dry out before watering again.
Humidity: Crotons thrive in high humidity. To maintain adequate humidity levels, mist the leaves regularly or place a humidifier nearby. Alternatively, you can place the pot on a tray filled with water and pebbles to increase humidity around the plant.
Soil and Potting
Crotons need well-draining soil to prevent root rot. Here’s what to consider when potting your plant:
Soil Mix: Use a well-draining potting mix, such as a blend of potting soil, peat moss, and perlite. This ensures good aeration and drainage.
Pot Size: Choose a pot with drainage holes to allow excess water to escape. Repot your croton every 2-3 years to refresh the soil and give the roots more room to grow.
Temperature and Humidity
Being tropical plants, crotons prefer warm, humid conditions. Here are some temperature and humidity guidelines:
Temperature: Keep your croton in a warm environment, ideally between 60-85°F (15-29°C). Avoid placing it near drafts, air conditioners, or heaters, as sudden temperature changes can stress the plant.
Humidity: Aim for humidity levels of 40-80%. Use a humidity tray, humidifier, or regular misting to maintain the desired humidity.
Fertilization
Crotons benefit from regular feeding during the growing season (spring and summer). Here’s how to fertilize your plant:
Frequency: Fertilize every 4-6 weeks during the growing season with a balanced, water-soluble fertilizer. Reduce feeding in fall and winter when the plant’s growth slows down.
Application: Follow the instructions on the fertilizer package for the correct dosage. Over-fertilization can damage the plant, so it’s better to underfeed than overfeed.
Pruning and Maintenance
Regular pruning helps maintain the shape and encourages bushier growth. Here’s how to prune your croton:
Pruning: Trim back any leggy or overgrown stems to promote a more compact shape. Remove any dead or damaged leaves to keep the plant looking its best.
Cleaning: Dust the leaves regularly to keep them clean and allow the plant to photosynthesize efficiently. Use a damp cloth to gently wipe the leaves.
Common Problems and Solutions
Crotons are relatively hardy but can face some common issues:
Leaf Drop: Sudden leaf drop can be caused by changes in temperature, light, or humidity. Ensure consistent care to prevent stress.
Pests: Look out for pests like spider mites, mealybugs, and scale. Treat infestations with insecticidal soap or neem oil.
Yellowing Leaves: Overwatering or underwatering can cause yellow leaves. Check your watering routine and adjust as needed.
With their vibrant colors and striking appearance, croton plants can be a beautiful addition to your home. By providing the right light, water, temperature, and care, you can enjoy a healthy and thriving croton plant.
Remember to monitor your plant regularly and adjust your care routine as needed to keep your croton looking its best.
Propagation of Croton Plants
If you want to expand your collection or share this beautiful plant with friends, croton propagation is relatively straightforward. Here’s a step-by-step guide to propagate your croton plant:
Stem Cuttings
Select a Healthy Stem: Choose a healthy stem with several leaves. It should be at least 3-4 inches long.
Cut the Stem: Using a clean, sharp knife or scissors, cut the stem just below a node (the point where leaves attach to the stem).
Remove Lower Leaves: Remove the lower leaves from the stem, leaving a few leaves at the top.
Rooting Hormone (Optional): Dip the cut end of the stem in rooting hormone to encourage faster root development.
Plant the Cutting: Insert the cutting into a pot filled with a well-draining potting mix. Ensure the soil is moist but not waterlogged.
Cover and Maintain Humidity: Cover the pot with a plastic bag or place it in a propagation dome to maintain high humidity. Ensure the cover doesn’t touch the leaves.
Place in Bright, Indirect Light: Keep the cutting in a warm, bright spot with indirect light. Avoid direct sunlight.
Wait for Roots to Develop: Roots should start to develop within 4-6 weeks. You can check by gently tugging on the cutting—if you feel resistance, roots have formed.
Transplant: Once the cutting has established roots, transplant it to a larger pot with regular croton care.
Seasonal Care Tips
Spring and Summer
Growth Phase: Crotons actively grow during spring and summer. This is the best time for repotting, fertilizing, and propagating.
Watering: Increase watering frequency to keep the soil consistently moist, as plants use more water during active growth.
Feeding: Regularly fertilize every 4-6 weeks to support new growth.
Fall and Winter
Dormant Phase: Growth slows down in the cooler months. Reduce watering and feeding during this period.
Light: Ensure the plant still receives plenty of light, as shorter days can reduce light availability. Consider using grow lights if natural light is insufficient.
Humidity: Indoor heating can lower humidity levels. Use a humidifier or mist the plant regularly to maintain humidity.
Troubleshooting Common Issues
Leaf Discoloration
Yellow Leaves: Often a sign of overwatering or poor drainage. Ensure the pot has adequate drainage and allow the soil to dry slightly between waterings.
Brown Leaf Tips: Can indicate low humidity or too much direct sunlight. Increase humidity and adjust the plant’s light exposure.
Pests
Spider Mites: Tiny, spider-like pests that can cause webbing and leaf damage. Treat with insecticidal soap or neem oil.
Mealybugs: Appear as white, cotton-like masses on the plant. Remove manually with a cotton swab dipped in rubbing alcohol, and treat with insecticidal soap.
Scale Insects: Hard, shell-like pests that attach to stems and leaves. Scrape off gently and treat with horticultural oil.
Environmental Stress
Leaf Drop: Sudden changes in environment, such as moving the plant or changing its location, can cause leaf drop. Gradually acclimate the plant to new conditions to reduce stress.
Temperature Fluctuations: Avoid placing crotons near drafts, air conditioners, or heaters to prevent temperature stress.
Caring for a croton plant requires attention to its specific needs, but the reward is a strikingly colorful and lush plant that can enhance any indoor or outdoor space. By following these guidelines on light, water, soil, and general care, you can enjoy a healthy and vibrant croton for years to come. Regular monitoring and adjustments based on your plant’s responses will ensure that your croton remains a centerpiece of your plant collection.


